Creating a Kubernetes Cluster on AWS EC2 Using a user-data Script
In this post, we’ll walk through creating a simple Kubernetes cluster on a single AWS EC2 instance using K3s, a lightweight Kubernetes distribution. K3s is easy to install, uses half the memory of standard Kubernetes, and comes in a compact binary of less than 100 MB.
The process involves four key steps:
- Setting up security groups with essential ports
- Launching and configuring an EC2 instance with K3s using user-data script
- Verifying the cluster’s functionality
- Optional: Setting up local machine access
Prerequisites
- An AWS console account with permissions to create EC2 instances and security groups
Step 1: Create Security group
- Open the Amazon EC2 console at https://console.aws.amazon.com/ec2/.
- In the navigation pane, choose Security Groups.
- Choose Create security group.
- Enter a descriptive name and brief description for the security group. You can’t change the name and description of a security group after it is created.
- For VPC, choose the VPC in which you’ll run your Amazon EC2 instances.
- For inbound rules, choose Inbound rules. For each rule, choose Add rule and specify the protocol, port, and source. I’ve configured Port 22 for SSH access and Port 6443 to expose the Kubernetes API. While I’ve currently opened these ports to all IP addresses (0.0.0.0/0), this isn’t secure — you should restrict access to your specific IP address.
- To add outbound rules, choose Outbound rules. For each rule, choose Add rule and specify the protocol, port, and destination. Otherwise, you can keep the default rule, which allows all outbound traffic.
- Choose Create security group.

Screen shot of security group
Step 2: Launch instance
- Open the Amazon EC2 console at https://console.aws.amazon.com/ec2/.
- In the navigation bar at the top of the screen, the current AWS Region is displayed (for example, US East (Ohio)). If needed, select a different Region in which to launch the instance.
- From the Amazon EC2 console dashboard, choose Launch instance.
- (Optional) Under Name and tags, for Name, enter a descriptive name for your instance.
- Under Application and OS Images (Amazon Machine Image), choose Quick Start, and then choose the operating system (OS) for your instance. I chose Amazon Linux, t2.micro instance type.
- Under Key pair (login), for Key pair name, choose an existing key pair or create a new one.
- Expand the Advanced details toggle menu and paste the following script into the user data field. I added comments on below script for the details. You can change configuration variables depending on your use case. This script installs K3s, sets up NGINX Ingress, exposes the Kubernetes API using the instance’s public IP, and verifies the installation by creating a sample deployment.
#!/bin/bash
# === CONFIGURATION VARIABLES ===
install_nginx_ingress=true # set to true or false
expose_kubeapi=true # set to true or false
k3s_version="v1.31.6+k3s1" # set to "latest" or specific version like "v1.28.5+k3s1"
k3s_token="REPLACE_WITH_YOUR_RANDOM_TOKEN" # No special characters
nginx_ingress_release="v1.12.0" # if nginx ingress is enabled
# === FUNCTION DEFINITIONS ===
check_os() {
name=$(grep ^NAME= /etc/os-release | sed 's/"//g')
clean_name=${name#*=}
version=$(grep ^VERSION_ID= /etc/os-release | sed 's/"//g')
clean_version=${version#*=}
major=${clean_version%.*}
minor=${clean_version#*.}
if [[ "$clean_name" == "Ubuntu" ]]; then
operating_system="ubuntu"
elif [[ "$clean_name" == "Amazon Linux" ]]; then
operating_system="amazonlinux"
else
operating_system="undef"
fi
echo "K3S install process running on: "
echo "OS: $operating_system"
echo "OS Major Release: $major"
echo "OS Minor Release: $minor"
}
# === MAIN EXECUTION ===
check_os
AWS_IMDS_TOKEN=$(curl -s -X PUT "http://169.254.169.254/latest/api/token" \
-H "X-aws-ec2-metadata-token-ttl-seconds: 21600")
# Install dependencies
if [[ "$operating_system" == "ubuntu" ]]; then
apt-get update
apt-get install -y software-properties-common unzip git nfs-common jq
DEBIAN_FRONTEND=noninteractive apt-get upgrade -y
curl -s "https://awscli.amazonaws.com/awscli-exe-linux-x86_64.zip" -o "awscliv2.zip"
unzip -q awscliv2.zip
sudo ./aws/install
rm -rf aws awscliv2.zip
elif [[ "$operating_system" == "amazonlinux" ]]; then
yum install -y --skip-broken unzip curl jq git
else
echo "Unsupported OS: $operating_system"
exit 1
fi
# Prepare K3s install params
k3s_install_params=()
if [[ "$install_nginx_ingress" == true ]]; then
k3s_install_params+=("--disable" "traefik")
fi
if [[ "$expose_kubeapi" == true ]]; then
provider_public_ip="$(curl -s -H "X-aws-ec2-metadata-token: $AWS_IMDS_TOKEN" \
http://169.254.169.254/latest/meta-data/public-ipv4)"
k3s_install_params+=("--tls-san" "${provider_public_ip}")
fi
INSTALL_PARAMS="${k3s_install_params[*]}"
echo "INSTALL_PARAMS: $INSTALL_PARAMS"
# Get K3s version
if [[ "$k3s_version" == "latest" ]]; then
K3S_VERSION=$(curl -s https://api.github.com/repos/k3s-io/k3s/releases/latest | jq -r '.name')
else
K3S_VERSION="$k3s_version"
fi
# Install K3s with retries
until (curl -sfL https://get.k3s.io | INSTALL_K3S_VERSION=$K3S_VERSION K3S_TOKEN=$k3s_token sh -s - --cluster-init $INSTALL_PARAMS); do
echo 'k3s did not install correctly'
exit 1
sleep 2
done
# Wait for k3s to become ready
until kubectl get pods -A 2>/dev/null | grep 'Running'; do
echo 'Waiting for k3s startup'
sleep 5
done
# Configure kubectl alias
echo 'alias k=kubectl' >>~/.bashrc
source ~/.bashrc
# Optionally install nginx ingress
if [[ "$install_nginx_ingress" == true ]]; then
kubectl apply -f https://raw.githubusercontent.com/kubernetes/ingress-nginx/controller-${nginx_ingress_release}/deploy/static/provider/cloud/deploy.yaml
kubectl create deployment demo --image=httpd --port=80
until kubectl get pods --namespace=ingress-nginx 2>/dev/null | grep 'Running'; do
echo 'Waiting for nginx ingress controller to start'
sleep 5
done
fi
8. In the Summary panel, choose Launch instance. Below is the snapshot of before I click Launch Instance.

Step 3: Confirm Kubernetes Cluster
Access to your instance through SSH and check Kubernetes working correct
[ec2-user@ip-172-31-30-75 ~]$ sudo su # user-data installed kubernetes with root user
[root@ip-172-31-30-75 ec2-user]# kubectl get nodes
NAME STATUS ROLES AGE VERSION
ip-172-31-30-75.ec2.internal Ready control-plane,etcd,master 58m v1.31.6+k3s1
[root@ip-172-31-30-75 ec2-user]#
If you cannot see that your Kubernetes is not working, you can checkthe initial user-data log on your EC2 instance by:
tail -n 100 /var/log/cloud-init-output.log
That’s it! Your K3s Kubernetes cluster is now ready to use. Note that additional security configurations are recommended, though we won’t cover those in this post.
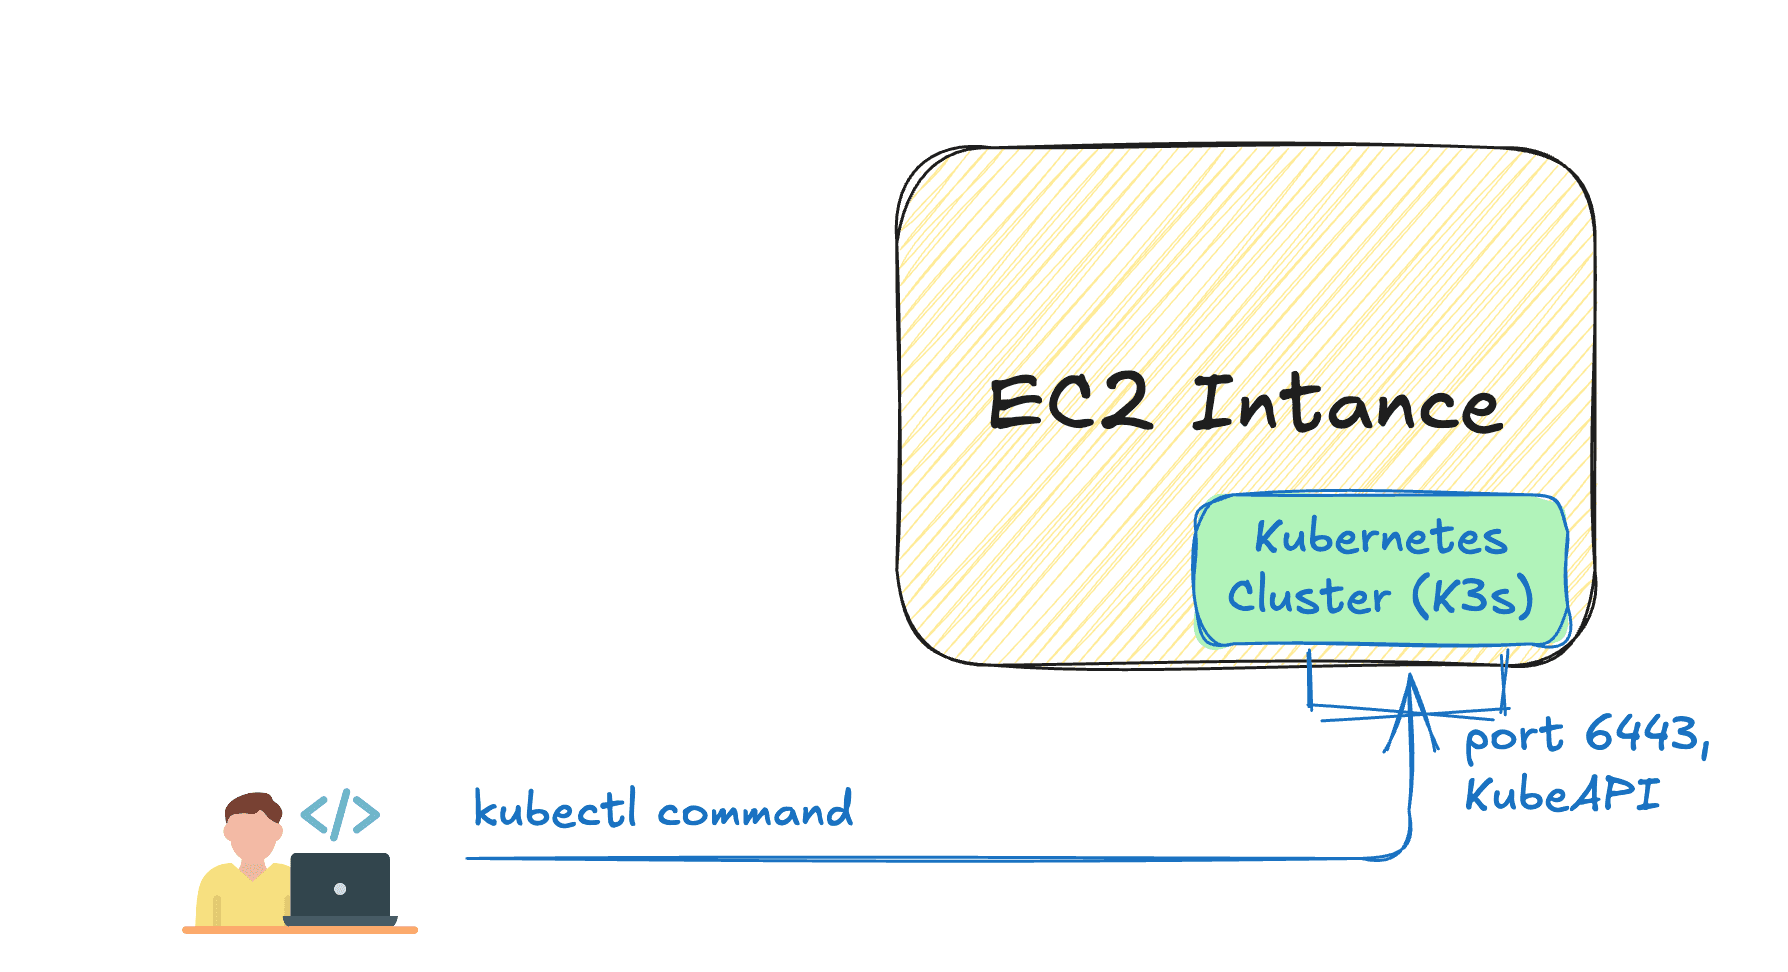
Step 4 (Optional): Access to your Kubernetes API from your local machine
As you can see in the above, we exposed Kubernetes API while installing K3s and exposed 6443 on our security group configuration. Which enables us to access our Kubernetes cluster from our local machine. To access, you need steps below
- Install `kubectl` command-command line tool into your local machine using this official Kubernetes guide, depending on your machine: https://kubernetes.io/docs/tasks/tools/#kubectl.
I simply installed it on my Mac by:brew install kubectlIf you installed kubectl properly, you can use with below command
kubectl version --client
2. Transfer kubeconfig file from the EC2 instance to your local machine
scp -i mykeypair.pem root@remote-host:/etc/rancher/k3s/k3s.yaml ~/.kube/my-ec2-remote-k3s.yaml
3. Update server address:
Replace https://127.0.0.1:6443 with the public IP or DNS of your remote host. Example:
server: http://:6443
4. Set KUBECONFIG locally
export KUBECONFIG=~/.kube/remote-k3s.yaml
5. Finally, check your Kubernetes cluster on your EC2 accessible from your local machine. This shows you list of nodes you are connected with:
kubectl get nodes
If you see your EC2 node listed in the output, it means the connection is successful — you can now interact with your Kubernetes cluster from your local machine using kubectl.
Summary
Setting up a Kubernetes cluster with k3s doesn’t have to be complicated. This guide walks through creating a lightweight Kubernetes cluster using K3s on AWS EC2.
However, before diving in, consider these crucial points about Kubernetes adoption:
- Evaluate your scaling needs — Kubernetes is ideal for rapid scaling scenarios, as migration later can be challenging
- Ensure you have qualified personnel — Kubernetes requires expertise for proper management, as it’s not secure by default
- Consider managed services — Rather than building your own cluster, it’s recommended to use managed Kubernetes services that handle the complex operational aspects
Reference:
https://docs.aws.amazon.com/AWSEC2/latest/UserGuide/ec2-launch-instance-wizard.html
https://docs.aws.amazon.com/AWSEC2/latest/UserGuide/creating-security-group.html
https://github.com/devsteppe9/k3s-aws-cdk/blob/main/scripts/k3s-master-install.sh
https://docs.k3s.io/
https://docs.k3s.io/cluster-access