Hosting a DNS Server on My Homelab Kubernetes Cluster
Network wide ad-blocking in your home internet
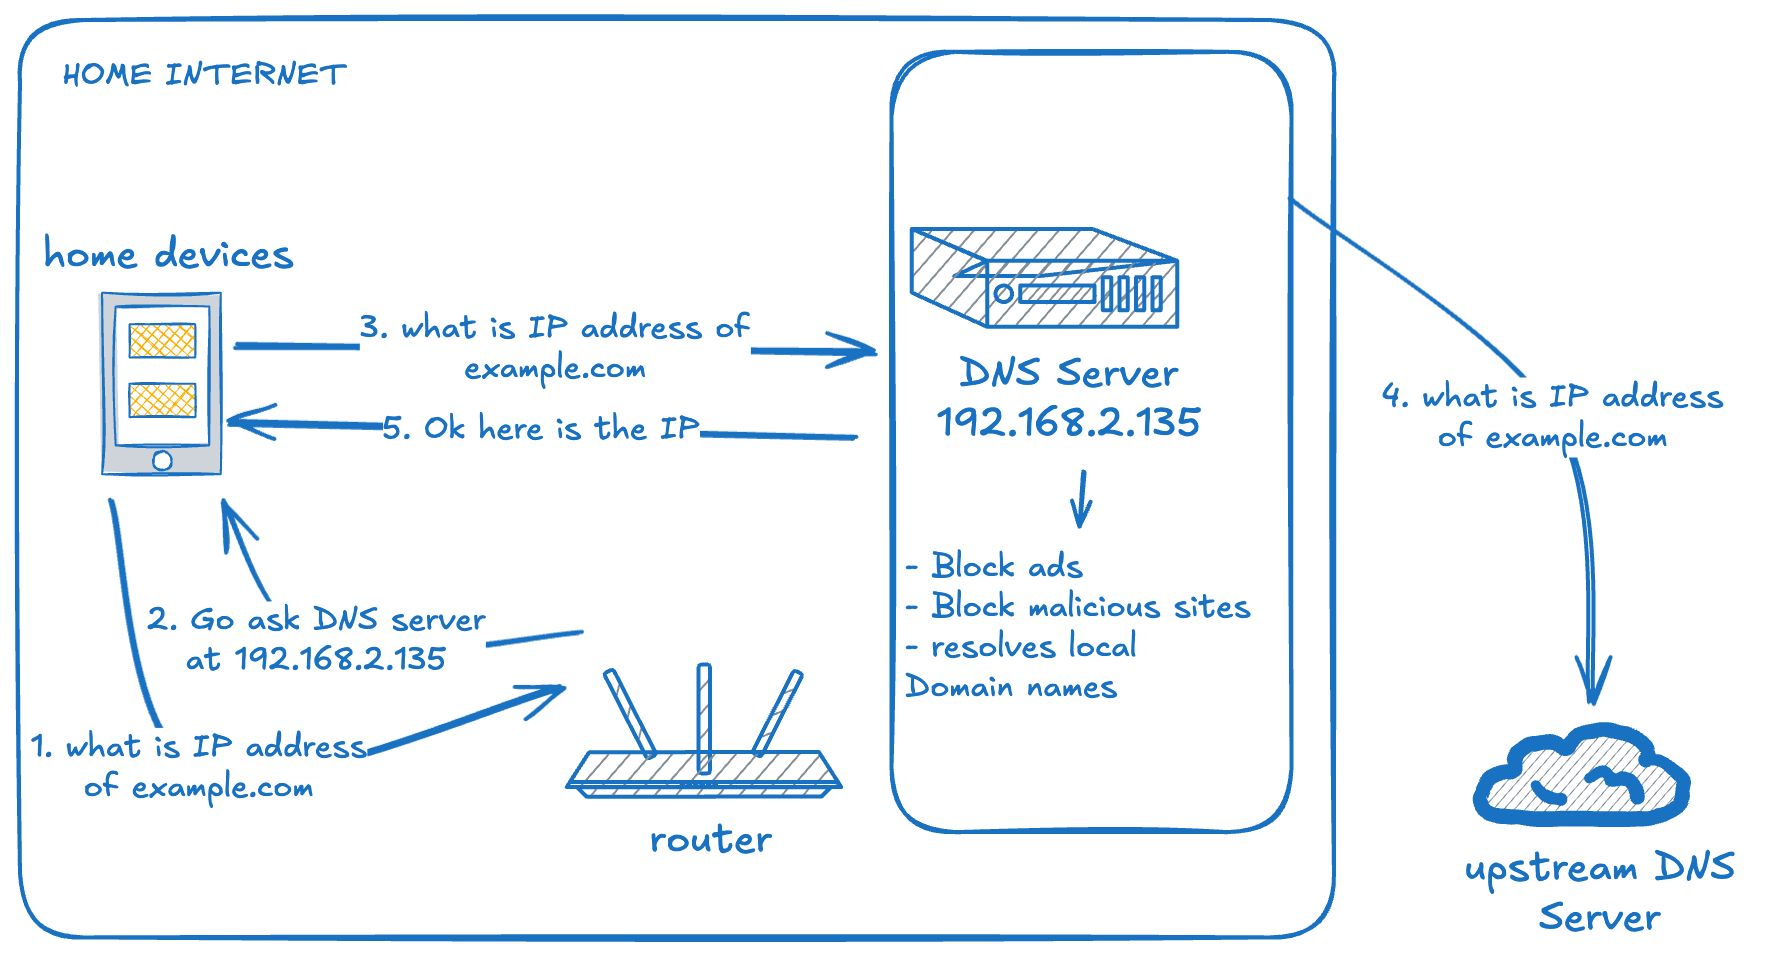
I decided to host my own DNS server on my homelab Kubernetes cluster. There are many reasons why someone might want to run a self-hosted DNS server, but for me, the main motivations were network-wide ad blocking and local DNS rewriting.
Why Host Your Own DNS?
1. Network-Wide Ad Blocking
By running my own DNS server, I can block ads, malicious sites, and unwanted tracking across the entire network—without installing ad blockers on each individual device.
This is especially useful in a household with kids. They tend to download lots of apps, many of which come with annoying ads and sometimes questionable network requests. With DNS-level blocking, all of that can be filtered automatically at the network level.
2. Local DNS Rewriting for Homelab Services
The second major reason was the ability to use local domain names for my homelab services.
For example:
| Domain | Answer |
| homelab.lan | 192.168.1.234 |
| *.homelab.lan | homelab.lan |
With these rewrites in place, I can expose services using Traefik or NGINX Proxy Manager and access them via friendly URLs.
Instead of visiting something like http://192.168.1.234:9090
I can simply use: http://linkding.homelab.lan
Much cleaner and easier to remember.
Setup
While researching open-source DNS solutions, I came across AdGuard Home and Pi-hole. Both have excellent features, strong communities, and web-based dashboards.
I chose AdGuard Home because of its simplicity and clean, user-friendly dashboard.
Kubernetes Deployment
I created a Kubernetes manifest to deploy AdGuard Home. You can find it here:
👉 Gist: https://gist.github.com/devsteppe9/bf2ec5e81fa2f559c49f94e34b3064e0
⚠️ Tip:
I recommend creating the KubernetesServiceat the very end. When I exposed DNS too early, it changed the local DNS resolver on the node, which caused issues resolvingdocker.iowhile pulling images. There are probably cleaner ways to handle this, but I wanted to keep the setup simple.
Initial Configuration
Once installed, AdGuard Home binds to:
UDP 53 / TCP 53 – DNS
Port 3000 – Admin dashboard
You can access the web interface at: http://<your-server-ip>:3000
You’ll be prompted to:
Create an admin user
Configure upstream DNS servers
Router Configuration
After AdGuard is running, you need to tell your router to use it as the DNS server.
Every router is different. In my case (Starlink), I configured this through the mobile app:
Enabled Custom DNS
Set my AdGuard server IP as Primary DNS
Added Google DNS as a fallback in case my server goes down

Results
With AdGuard in place, I immediately started seeing blocked ads and tracking requests. I was also surprised to discover that some devices—like TVs and even appliances—were constantly sending analytics data to the internet.
AdGuard made it easy to block all of this traffic. You can also customize blocklists further in the settings, but for my use case, the default AdGuard lists were more than sufficient.

Summary
In this post, I shared how I set up my own DNS server using AdGuard Home on a Kubernetes homelab. The benefits have been huge:
Network-wide ad and tracker blocking
Improved privacy
Friendly local domain names for homelab services
No need to remember IPs or ports
I hope this gives you some inspiration for your own homelab setup. See you in the next one!