Self-hosted Google Photos by Immich
On My Basement Kubernetes Cluster (With Optional S3 Backups)
I've been hosting my Kubernetes cluster in the cloud for a while, but recently I managed to get my hands on a bare-metal server — a Dell PowerEdge with 32 CPU cores and 128GB RAM 😮 — and set it up in my basement. Naturally, I turned it into a Kubernetes node.
Problem
In our household, we have multiple Android and iPhone devices filled with photos and videos. Since we don’t want to pay for cloud services like iCloud or Google Photos, our media library has always been at risk. If a device breaks or gets lost, years of memories disappear with it.
Now that I have a powerful home Kubernetes cluster running, I decided to finally solve this problem.
Solution
Immich for Photo & Video Backup
After researching self-hosting options, I discovered an amazing open-source project called Immich.

I chose Immich because:
It has official mobile apps and a web interface
Supports facial recognition, OCR, and multi-user features
Has a strong community (over 86k GitHub stars)
Easy enough that non-technical family members can use it
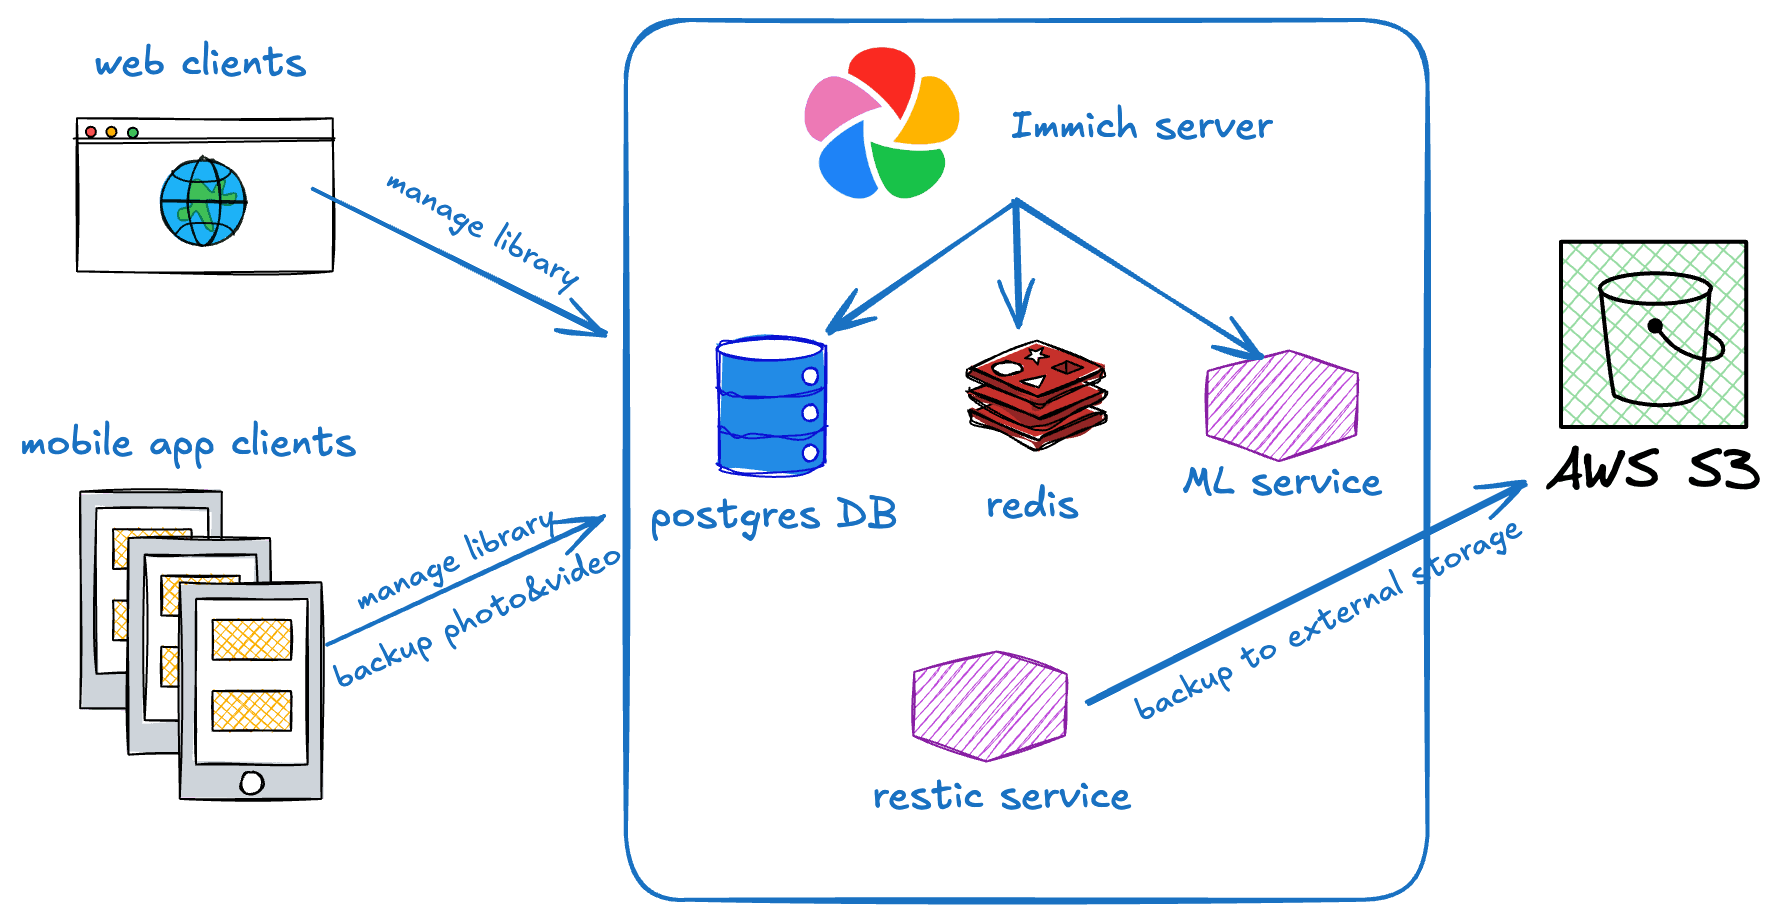
We installed the Immich app on our phones and connected it to the Immich server running inside our private network.
(Optional) External Backup to AWS S3 Using Restic
There was still one more risk:
If our home server or NAS disk failed, all our backups would be gone.
To protect against that, I set up an additional off-site backup to AWS S3 using an open-source tool called Restic.
Restic tracks backup folders and database dumps, then incrementally uploads them to S3. Since I store everything in S3 Glacier Flexible Retrieval, the cost is extremely low.
S3 Glacier (us-east-1): $0.0036 per GB
That’s $3.60/month for 1 TB of data — super affordable.
Deployment
Immich requires PostgreSQL, Redis, and its machine-learning services. I also added Restic backup Jobs/CronJobs.
I prepared a full Kubernetes manifest for this setup:
👉 YAML file:
https://gist.github.com/devsteppe9/17b83f51ca05c5012632d32c5e42cea5
Before applying it, update the following depending on your environment:
PersistentVolume paths (if using local storage or NAS)
External Postgres/Redis URLs (if you already run those separately)
Then simply apply:
kubectl apply -f FILENAME.yaml
Once deployed, Immich is ready to use. The first user to register will be the admin user. The admin user will be able to add other users to the application.
To register for the admin user, access the web application at http://< ip-address>:2283 and click on the Getting Started button.
The mobile app can be downloaded from the following places:
Obtainium: You can get your Obtainium config link from the Utilities page of your Immich server.
GitHub Releases (apk)On the mobile app, just enter your Immich URL, username, and password — and start backing up!
After uploading our media to Immich, we ended up with approximately 160GB of data. With the Kubernetes configuration mentioned above, Restic initializes and uploads the data to AWS S3, and I can confirm that it has been successfully transferred
➜  ~ kubectl logs restic-init-4trwh
Initializing restic repository...
open repository
no parent snapshot found, will read all files
load index files
start scan on [/data]
start backup on [/data]
scan finished in 2.639s: 17108 files, 157.909 GiB

Files:       17108 new,     0 changed,     0 unmodified
Dirs:        16615 new,     0 changed,     0 unmodified
Data Blobs:      0 new
Tree Blobs:      0 new
Added to the repository: 0 B   (0 B   stored)

processed 17108 files, 157.909 GiB in 21:04
snapshot 560b0e01 saved
And let’s confirm from AWS S3:

Like this, relic tracks my filesystem and uploads any new or changed files to S3 every day
Summary
By self-hosting Immich on my home Kubernetes cluster and optionally backing up everything to AWS S3, we now have:
A safe private photo/video library
Control of our own data
Off-site backups in case the home server dies
I hope this setup inspires you! If you have your own self-hosting solution or ideas, feel free to share them